Open Detectionをインストールしたときのメモ。Open DetectoinはGoogle Summer of Code 2015 の成果を元に開発され、目的はロボット用のビジョンツール。2016年5月から更新されていないので、それほど新しい手法はない。簡単に使えて、高速なのが特徴という。簡単にビルドできるようなことが書かれているが、依存関係なのか自分の環境でビルドするのに苦労した。
ウェブサイト
ハードウェア環境
- CPU: Intel(R) Core(TM) i7-8700K CPU @ 3.70GHz (6 core)
- GPU: NVIDIA GTX 1080Ti
- Memory: 32GB
ソフトウェア環境
- Ubuntu16.04
- CUDA9.0
- OpenCV3.4.0
- OpenCV ContribとCudaのモジュールが必要。
- インストールはここを参照。
- VTK6
- sudo apt install vtk6 libvtk6-dev
- PCL1.8
ダウンロードと展開
- cd ~/src
- git clone https://github.com/krips89/opendetection.git
- SVMLightのウェブサイトへ行き、ソースを~/src/opendetection/3rdpartyにダウンロードする。
- cd ~/src/opendetection/3rdparty
- tar xvzf svm_light.tar.gz
ファイルの変更
-
- OpenCV3.4.0ではビルドでいろいろエラーが出たのでファイルを次のように変更した。
- ~/src/opendetection/CMakeLists.txtを次のように変更した。つまり、OD_SOURCE_DIRとOD_BINARY_DIRを設定し、include_directoriesを追加した。なお、9、10行目はホームポジションを示す~は使えないので注意。
cmake_minimum_required(VERSION 2.8)
project(OpenDetection)

set(CMAKE_CXX_FLAGS "${CMAKE_CXX_FLAGS} ")

# init variables for convinience
#set(OD_SOURCE_DIR ${OpenDetection_SOURCE_DIR})
#set(OD_BINARY_DIR ${OpenDetection_BINARY_DIR})
set(OD_SOURCE_DIR "/home/user_name/src/opendetection")  # changed
set(OD_BINARY_DIR "/home/user_name/src/opendetection/bin") # changed

# init directories before doing all the searches and includes
set(OD_CMAKE_DIR "${OpenDetection_SOURCE_DIR}/cmake" "${OpenDetection_SOURCE_DIR}/cmake/module\
s")
set(CMAKE_MODULE_PATH ${OD_CMAKE_DIR} ${CMAKE_MODULE_PATH})

# addtiion
include_directories(
  "~/src/opencv-3.4.0/modules/cudafilters/include"
  "~/src/opencv-3.4.0/modules/cudafeatures2d/include"
  "~/src/opencv-3.4.0/build/3rdparty"
  "~/src/pcl/pcl/apps/3d_rec_framework/include"
  "~/src/opendetection/3rdparty/pugixml-1.6/src"
  )

# include bunch of stuffs and set the appropriate variables
-
- ~/src/opendetection/common/CMakeLists.txtを次のように、opencv_cudafeatures2dをtarget_link_librariesに追加した。
 if(SUBSYS_DEPS)
      # target_link_libraries("${LIB_NAME}" ${SUBSYS_DEPS} )
      target_link_libraries("${LIB_NAME}" opencv_cudafeatures2d ${SUBSYS_DEPS} )
    endif(SUBSYS_DEPS)
- ~/src/opendetection_ros/detectors/global2D/ODFaceRecognizer.cpp
- 44行目と48行目を変更
- 変更前:cvrecognizer_ = cv::face::createFisherFaceRecognizer(num_components_, threshold_);
- 変更後:cvrecognizer_ = cv::face::FisherFaceRecognizer::create(num_components_, threshold_);
- 77行目
- 変更前:cvrecognizer_->load(files[0]);
- 変更後:cvrecognizer_->read(files[0]);
- 44行目と48行目を変更
ビルド
- cd ~/src/opendetection
- mkdir build
- cd build
- cmake ..
- make -j 12
- make install
データ取得
- cd ~/src/opendetection
- git clone https://github.com/krips89/opendetection_data.git
テスト
- 3次元の物体認識Detection 3Dを試してみる。このUser Guideを参照。
- CADのデータが必要なので、3D Warehouseなどからダウンロードして、~/data/CADModelsに保存する。3dwarehouseからcollada形式でダウンロードする。opendetectionではply形式にする必要があるので、meshlabなどでplyに変換する。なお、1つのオブジェクトに対して1つのディレクトリが必要で、ディレクトリ名はオブジェクト名にする。また、plyに変換したファイルのファイル名をMesh.plyに変更する。つまり、以下のようなファイル構造にする。
- ~/data/CADModels/pringles/Mesh.ply
- ~/data/CADModels/mugcup/Mesh.ply
- ~/data/CADModels/DrPepper/Mesh.ply
- Kinect V1をコンピュータに接続する。
- 机に識別したいオブジェクトを置く。
- cd ~/src/opendetection/build/examples/objectdetector
- ./od_example_pc_global_real_time <path_to_CAD_models> <trained_data_directory>で実行する。この例では次のコマンドを実行する。
- ./od_example_pc_global_real_time ~/data/CADModels/ ~/src/opendetection/opendetection_data/trained_data/
- 実行するとウインドウが開きリアルタイムで物体が識別された。
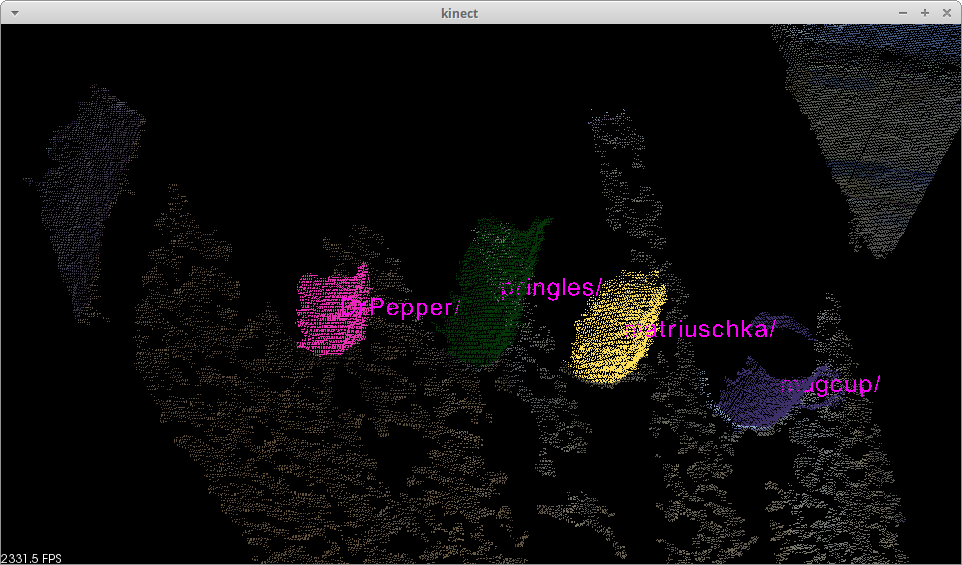
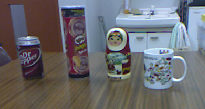
なお、カメライメージ画像を次のとおり。上のポイントクラウド画像はマウス操作で視点を変えているので見え方がイメージ画像とは違います。
以上。お疲れ様。

コメント