拙著(以下,教科書と表記)「ROS2とPythonで作って学ぶAIロボット入門」(講談社)を授業で使用したときの補足資料です.
教科書では,Smach(State Machine, スマッチと発音することが多いようです.)を使ったステートマシン(状態遷移機械)の作り方の説明が必ずしも十分ではないので補足します.
なお,SmachはROSでよく使われるステートマシン用のPythonライブラリで,これを使うと簡単に状態マシンをプログラムで書くことができます.
この記事は参考文献のサンプルコードをROS2化したものです.説明は参考サイトを参考に意訳し,わかりやすいように説明を追加しています.
Smachのインストール
ROS2 Foxyに対応したパッケージを以下の手順でインストールします.このパッケージはSmach viewerには対応していないようです.なお,教科書用のDockerイメージを使っている場合は,この作業は必要ありません.
$ cd ~/airobot_ws/src$ git clone https://github.com/jeffrey870517/executive_smach$ cd ~/airobot_ws$ colcon build$ source install/setup.bash
サンプル1:シンプルな2状態ステートマシン
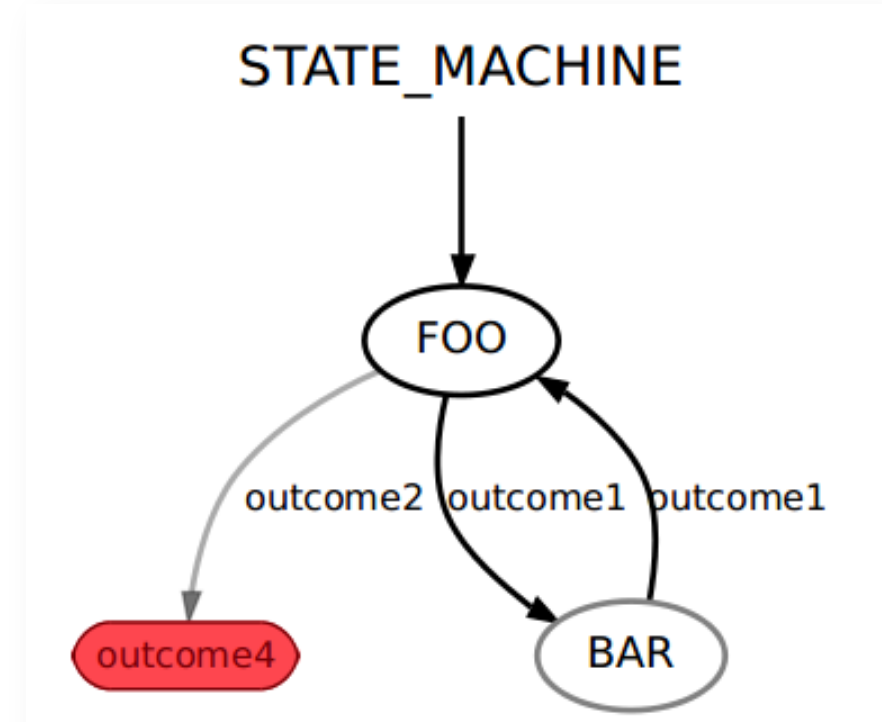
まず,2つの状態を持つ簡単なステートマシンを考えます.状態はFOOとBARです.初期状態はFOOで状態が終わるとoutcome1を出力し状態BARへ遷移します.状態BARは状態が終わると状態FOOへ遷移してoutcome1を出力します.赤字のoutcome4はステートマシンの可能性のある出力です.outcome4は状態ではないので,ステートマシンの最終出力です.この状態遷移図をSmachを使ってROS2とPythonで書いたのが以下のコードです.以下のコードは参考サイトのサンプルプログラムはROS1用なのでそれをROS2化したものです.
# File name: state_machine2.py
#!/usr/bin/env python
import rclpy
from rclpy.node import Node
import smach

rclpy.init()
_node = Node('state_machin2')


# define state Foo
class Foo(smach.State):
    def __init__(self):
        smach.State.__init__(self, outcomes=['outcome1','outcome2'])
        self.counter = 0
        self.logger = _node.get_logger()

    def execute(self, userdata):
        self.logger.info('Excuting state FOO')
        if self.counter < 3:
            self.counter += 1
            return 'outcome1'
        else:
            return 'outcome2'


# define state Bar
class Bar(smach.State):
    def __init__(self):
        smach.State.__init__(self, outcomes=['outcome1'])
        self.logger = _node.get_logger()

    def execute(self, userdata):
        self.logger.info('Executing state BAR')
        return 'outcome1'


def main():
    # Create a SMACH state machine
    sm = smach.StateMachine(outcomes=['outcome4'])

    # Open the container
    with sm:
        # Add states to the container
        smach.StateMachine.add('FOO', Foo(),transitions={'outcome1':'BAR', 'outcome2':'outcome4'})
        smach.StateMachine.add('BAR', Bar(),transitions={'outcome1':'FOO'})

    # Execute SMACH plan
    outcome = sm.execute()
- コンストラクタ__init__でステートマシンを初期化します(12行目):この例のFOOでは,smach.Stateクラスのコンストラクタを呼び出しています.FOOは状態が終わると,’outcome1’と’outcome2’を出力するようここで設定しています.あとは,メンバ変数のcounterを0に初期化し,_node.get_logger()と毎回書くのは大変なので,self.loggerで済ませるようにしています.
- executeメソッドで各状態が実行する処理を書きます(17行目).この例では,”状態FOOを実行中”と出力し,こでは, countの値が3より小さかったらcountに1を足して’outcome1’を返し,3より大きかったら’outcome2’を返しています.次の状態に遷移します.
- outcomeの説明:各状態は終了するとoutcomeを返します.outcomeは結果という意味です.outcomeは一つでも何個でも持つことができます.outcomeはユーザが定義する文字列で,どのように状態が終了するかを書いています.outcomeの例としては [‘succeeded’, ‘failed’, ‘awesome’]などが考えられます.次の状態への遷移は,前の状態のoutcomeによって指定されます.
- ステートマシンの作成(39行目):smach.StateMachineのインスタンスとしてステートマシンsmを作成します.この例では,smの出力は’outcome4’としています.なお,
- 状態の追加(42~45行目):ここでステートマシンsmに状態を追加します.smach.StateMachine.addが実施に追加するメソッドで,1番目に引数’FOO’は状態名,2番目は辞書型で,出力とその遷移先を書きます.なお,42行目のwithはPythonのwith文で,必要な処理をしてくれるものです.これにより,後処理などを実装しなくてもよいので簡単で安全なプログラムになります.
- 実行(48行目):execute()でステートマシンを実行します.
ハンズオン
サンプルプログラムを実行するstate_machin2パッケージを作成して,実際に動かし動作を確認しましょう.
- ディレクトリの移動
- $ cd ~/airobot_ws/src/chapter7
- ノード名state_machine2を指定してパッケージstate_machine2の作成
- $ ros2 pkg create –build-type ament_python –node-name state_machine2 state_machine2
- VSCodiumを起動して,上のサンプルプログラムをコピペして以下に保存
- ~/airobot_ws/src/chapter7/state_machine2/state_machine2/state_machine2.py
- ワークスペースに移動してビルド
- $ cd ~/airobot_ws
- $ colcon build
- 設定ファイルの反映
- $ source install/setup.bash
- 実行
- $ ros2 run state_machine2 state_machine2
練習:シンプルな3状態ステートマシン
以下のコードを読んで,サンプル1のようなSmachの状態遷移図を書いてみましょう.なお,このコードは参考サイトのサンプルプログラムをROS2化したものです.
#!/usr/bin/env python
import rclpy
from rclpy.node import Node
import smach
import smach_ros

class ExampleState(smach.State):
    def __init__(self):
        smach.State.__init__(self, outcomes = ['done'])
        # Create node
        #self.node = Node("example_state")

    def execute(self, ud):
        return 'done'


def main():
    rclpy.init()
    node = Node("state_machine")

    # Create a SMACH state machine
    sm = smach.StateMachine(outcomes=['succeeded','aborted'])

    # Open the container
    with sm:
        # Add states to the container
        smach.StateMachine.add('FOO', ExampleState(), {'done':'BAR'})
        smach.StateMachine.add('BAR', ExampleState(), {'done':'BAZ'})
        smach.StateMachine.add('BAZ', ExampleState(), {'done':'succeeded'})

    # Execute SMACH plan
    outcome = sm.execute()
サンプル2:ユーザデータの受け渡し
サンプル1では状態遷移だけをするステートマシンでした.サンプル2では,各状態間でデータをやり取りする方法を説明します.
- userdata:ユーザデータは状態に入出力されるデータの構造体です.
- input_keys: その状態が実行するために必要な全入力リストで,userdataの属性(field)に入ります.executeメソッドは,ユーザデータ構造体のコピーが渡されます.状態は全てのuserdataの属性を読むことができますが,書くことはできません.
- output_keys:その状態が出力する全出力リストで,状態はユーザデータ構造体のすべての属性に書き込むことができます.
- remapping:リマッピングは,状態の入出力とステートマシンの入出力を対応づけます.
以下のコードは参考サイトのサンプルプログラムをROS2化したものです.
# File name: state_machine3.py
#!/usr/bin/env python
import rclpy
from rclpy.node import Node
import smach

# create node
rclpy.init()
_node = Node('smach_example_state_machine')

# define state Foo
class Foo(smach.State):
    def __init__(self):
        smach.State.__init__(self,
                             outcomes=['outcome1','outcome2'],
                             input_keys=['foo_counter_in'],
                             output_keys=['foo_counter_out'])
        self.logger = _node.get_logger()

    def execute(self, userdata):
        self.logger.info('Executing state FOO')
        if userdata.foo_counter_in < 3:
            userdata.foo_counter_out = userdata.foo_counter_in + 1
            return 'outcome1'
        else:
            return 'outcome2'


# define state Bar
class Bar(smach.State):
    def __init__(self):
        smach.State.__init__(self,
                             outcomes=['outcome1'],
                             input_keys=['bar_counter_in'])
        self.logger = _node.get_logger()

    def execute(self, userdata):
        self.logger.info('Executing state BAR')
        self.logger.info('Counter = %f'%userdata.bar_counter_in)
        return 'outcome1'


def main():
    # Create a SMACH state machine
    sm = smach.StateMachine(outcomes=['outcome4'])
    sm.userdata.sm_counter = 0

    # Open the container
    with sm:
        # Add states to the container
        smach.StateMachine.add('FOO', Foo(),
                               transitions={'outcome1':'BAR',
                                            'outcome2':'outcome4'},
                               remapping={'foo_counter_in':'sm_counter',
                                          'foo_counter_out':'sm_counter'})
        smach.StateMachine.add('BAR', Bar(),
                               transitions={'outcome1':'FOO'},
                               remapping={'bar_counter_in':'sm_counter'})


    # Execute SMACH plan
    outcome = sm.execute()
ハンズオン
state_machine2パッケージと同様にstate_machine3パッケージを作成,実行して動作を確認しよう!
演習問題
- 授業で説明した自動販売機のステートマシンをSmachで実装してください.
参考サイト
終わり


コメント