
ROS2でWebotsシミュレータでiRobot社のCreate2を動かしましょう!本記事ではカナダのSimon Fraser University, Autonomy Lab.のJacob PerronさんのフォークしたiRobot社のRoomba, Create2用のROS2ドライバー create2_autonomyを使います。なお、この記事はテストが十分ではなく、備忘録として執筆中です。エラーが出る場合があると思います。ご了承ください。
- 参考サイト
- 環境
- Ubuntu20.04
- ROS2 Foxy
- 準備
$ sudo apt update$ sudo apt upgrade$ sudo apt install -y python3-rosdep python3-colcon-common-extensions$ sudo apt install build-essential python3-colcon-mixin python3-vcstool
- Webotsのインストール
$ sudo apt install ros-foxy-webots-ros2
- Create2関連パッケージのインストール
- ワークスペースの生成
- ディレクトリの作成
$ mkdir -p ~/airobo_ws/src$ cd ~/airobo_ws
- ビルド
$ colcon build
- 設定ファイルの実行
$ source install/local_setup.bash$ source install/setup.bash
- ディレクトリの作成
- ダウンロード
- ディレクトリの移動
$ cd ~/airobo_ws/src
- libcreateのクローン(ダウンロード)
$ git clone https://github.com/RoboticaUtnFrba/libcreate.git- 上記のパッケージはROS1用でcolcon buildできなかったので以下に変更した。
- git clone https://github.com/AutonomyLab/libcreate
- create2_autonomyのクローン
$ git clone https://github.com/RoboticaUtnFrba/create2_autonomy.git
- create2_hardwareのクローン
$ git clone https://github.com/RoboticaUtnFrba/create2_hardware.git
- create2_utilitiesのクローン。これはiRobot Create2のグラフィカルとテストツール。
$ git clone https://github.com/RoboticaUtnFrba/create2_utilities.git
- create2_descriptionのクローン。これはiRobotCreate2のWebots用のモデル記述パッケージ。
$ git clone https://github.com/RoboticaUtnFrba/create2_description.git
- webots_ros2のクローン。ROS2のWebotsパッケージ。
$ git clone https://github.com/RoboticaUtnFrba/webots_ros2.git
- ディレクトリの移動
- 依存関係ファイルのインストール
- 必要なパッケージのインストール
$ sudo apt install ros-foxy-image-pipeline$ sudo apt install bash-completion dirmngr gnupg2 lsb-release ros-foxy-diagnostic-updater$ sudo apt install python3-pip$ pip3 install -U argcomplete flake8 flake8-blind-except flake8-builtins flake8-class-newline flake8-comprehensions flake8-deprecated flake8-docstrings$ pip3 install -U flake8-import-order flake8-quotes pytest-repeat pytest-rerunfailures
- 他のファイルのインストール
$ cd ~/airobo_ws$ rosdep update$ rosdep install --from-paths src -yi
- 必要なパッケージのインストール
- ワークスペースのビルド
$ cd ~/airobo_ws- 私の環境では約3分でビルドが終了した。
$ colcon build
- 次のエラーがでる場合
— stderr: webots_ros2_importer
webots_simulation | error: package directory ‘webots_ros2_importer/urdf2webots/urdf2webots’ does not exist- 次のコマンドを実行する。
$ cd ~/airobo_ws/src/webots_ros2/webots_ros2_importer/webots_ros2_importer/urdf2webots$ git clone https://github.com/cyberbotics/urdf2webots.git$ cd urdf2webots$ pip3 install -r requirements.txt$ pip3 install urdf2webots- もう一度、ビルドと実行のコマンドを打つ。
- 次のコマンドを実行する。
- 次のエラーが出る場合
Starting >>> webots_ros2_core
— stderr: webots_ros2_importer
package init file ‘webots_ros2_importer/urdf2webots/urdf2webots/__init__.py’ not found (or not a regular file)- 次のコマンドを実行する。
$ cd ~/airobo_ws/src/webots_ros2/webots_ros2_importer/webots_ros2_importer/urdf2webots$ cp ../__init__.py .
- 次のコマンドを実行する。
- ワークスペースの生成
- 設 定
- このワークショップに使う以下の設定を以下のコマンドにより、エディタgeditで.bashrcファイルを開き、末尾にコピペして保存する。
$ gedit ~/.bashrc
- このワークショップに使う以下の設定を以下のコマンドにより、エディタgeditで.bashrcファイルを開き、末尾にコピペして保存する。
source /opt/ros/foxy/setup.bash
source ~/airobo_ws/install/local_setup.bash
-
- ROS2ではroscdコマンドの代わりにcolcon_cdコマンドを使う。これを使うとworkspaceのディレクトリ(この例では~/airobo_ws/src/各パッケージディレクトリ)に移動できる。次のコマンドを実行して~/.bashrcに追加する。
$ echo "source /usr/share/colcon_cd/function/colcon_cd.sh" >> ~/.bashrc$ echo "export _colcon_cd_root=~/airobo_ws" >> ~/.bashrc
- 以下のコマンドを実行して設定を反映させる。
$ source ~/.bashrc
- ROS2ではroscdコマンドの代わりにcolcon_cdコマンドを使う。これを使うとworkspaceのディレクトリ(この例では~/airobo_ws/src/各パッケージディレクトリ)に移動できる。次のコマンドを実行して~/.bashrcに追加する。
- 実 行
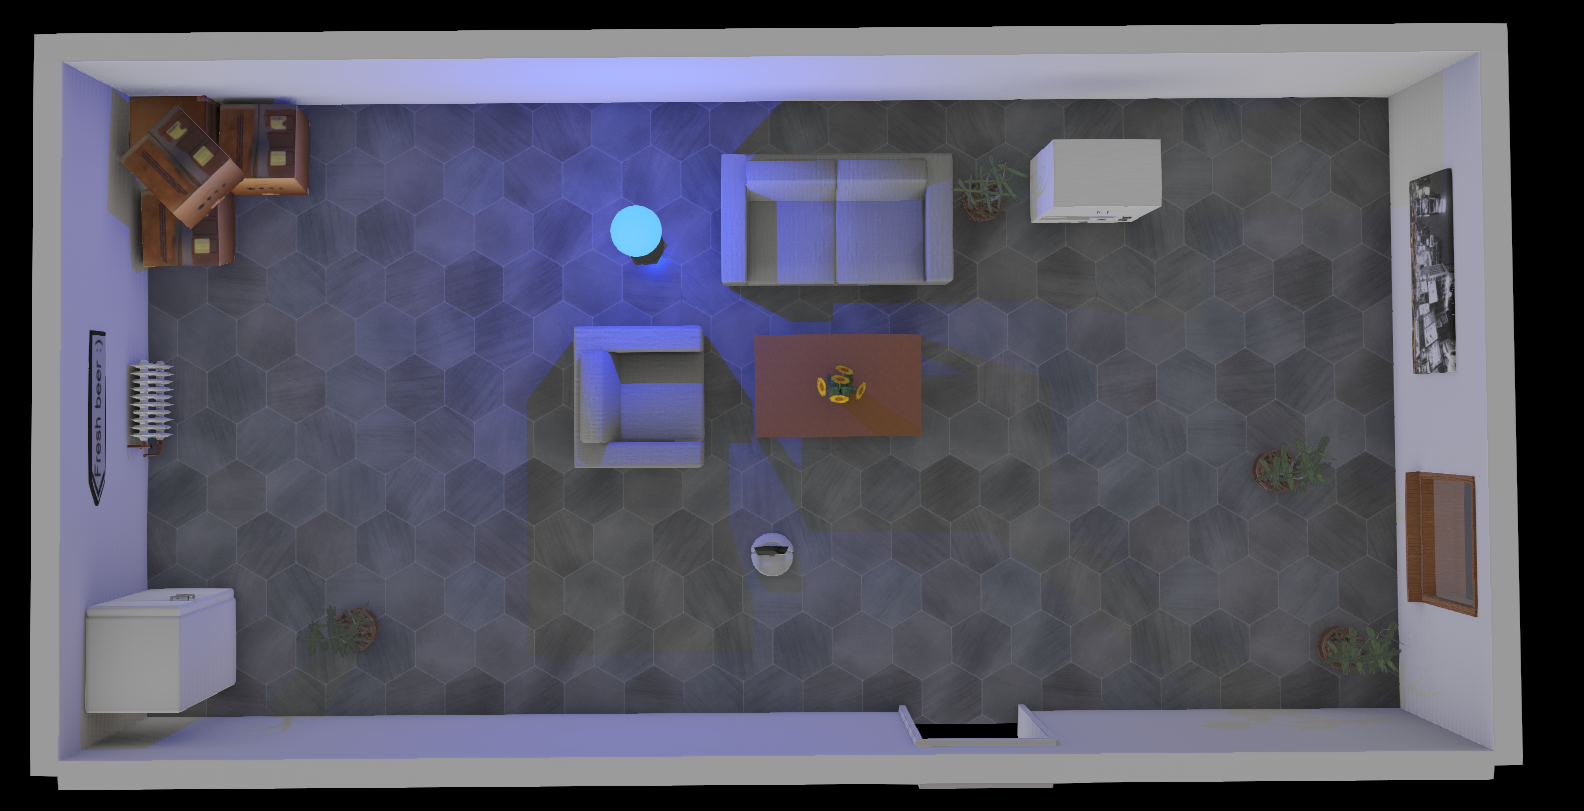
- 新たに端末を開き、以下のコマンドを実行してシミュレータWebotsを起動する。一番下図のルンバをベースにしたロボットが現れる。ros1ではlaunchファイルの起動はroslaunchだったが、ros2ではros2 launchとros2とlaunchの間にスペースを入れる。launchファイルがxmlフォーマットの他にpythonでも書けるようになった。うまく実行されるとトップのような画像が表示される。
$ ros2 launch create2_description spawn_robot.launch.py
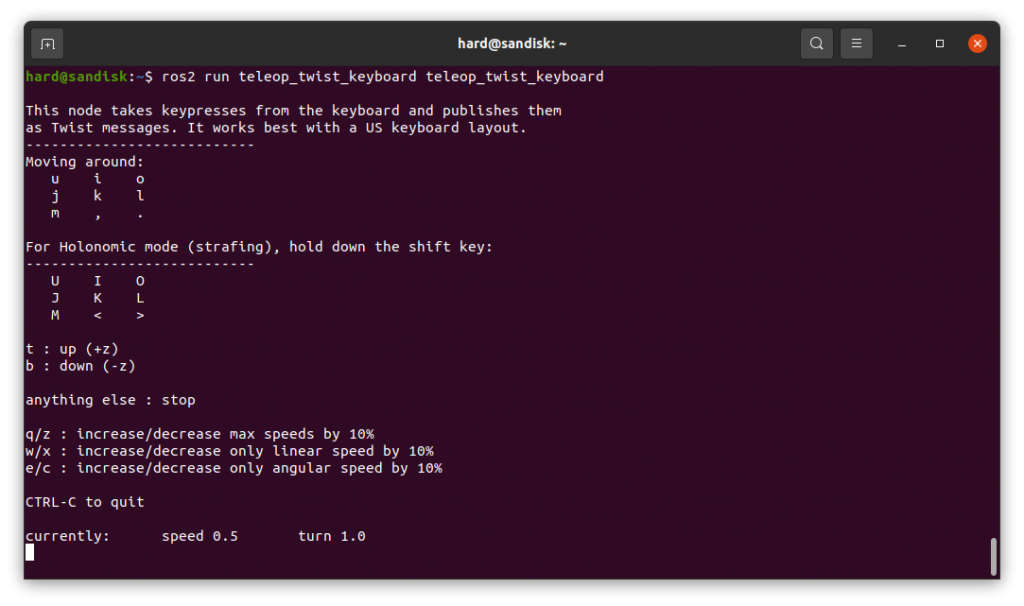
- 端末をもう一つ新たに開き、以下のコマンドを実行してGazebo上のルンバを遠隔制御する。ros1ではノードの実行はrosrunコマンドだったが、ros2ではros2 runコマンドとなる。これもros2とrunの間にスペースが必要。
$ ros2 run teleop_twist_keyboard teleop_twist_keyboard- 以下の画面になる。以下のキー操作でロボットを動かすことができる。なお、マウスのカーソルがこの2番目に開いた端末上にないとロボットは動かないので注意。
- i: 前進、u:左前進、o:右前進
- j: 左回転、k:停止、 l:右回転
- m:左後進、,:後進、 .:右後進
- スペース:停止
- w/x:並進速度増速/減速(10%)
- e/c:角速度増速/減速(10%)
- 新たに端末を開き、以下のコマンドを実行してシミュレータWebotsを起動する。一番下図のルンバをベースにしたロボットが現れる。ros1ではlaunchファイルの起動はroslaunchだったが、ros2ではros2 launchとros2とlaunchの間にスペースを入れる。launchファイルがxmlフォーマットの他にpythonでも書けるようになった。うまく実行されるとトップのような画像が表示される。
-
- 無事に動いたら成功。お疲れ様!
終わり

コメント