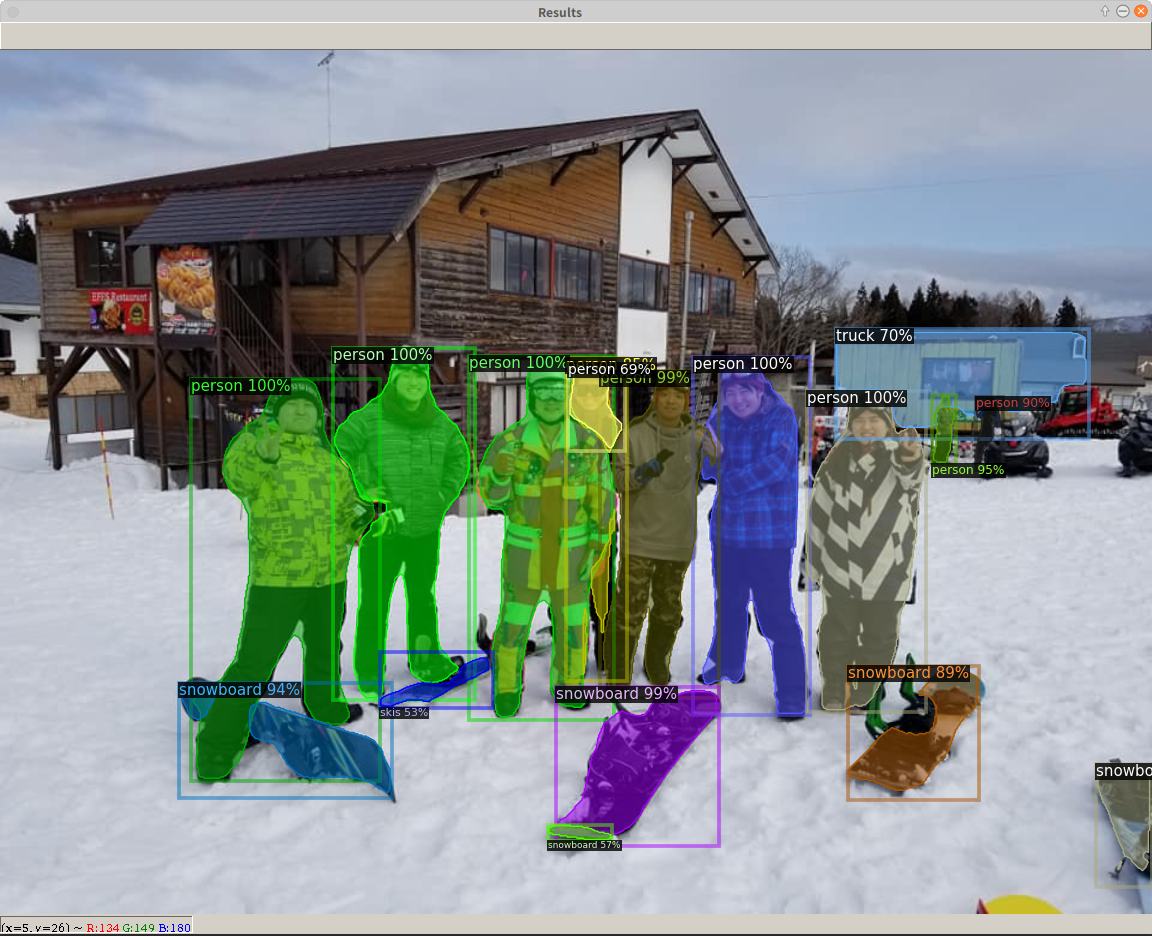

Facebook人工知能が開発している最新の物体検出アルゴリズムを実装しているソフトウェアシステムDetectron2のインストールメモ。Detectron2をインストールする前にPyTorchをインストールする。PyTorchはDeep Learningのフレームワークで、2019年12月にPreferred Networksが自前のフレームワークChainerの開発をやめて、PyTorchに乗り換えたことで日本でも注目を集めている。Detectron2のインストールはpipなのでとても簡単。なお、上の写真は先日、ラボのメンバーと池の平温泉スキー場へ行ったときの写真に物体検出アルゴリズム(Mask R-CNN)をかけたもの。Truck以外はほぼ正解。
PyTorch
- インストール
- $ pip3 install torch torchvision
- 検証
-
- 次のコマンドを実行して正常にインストールされているか試す
demulab@razer:~/$ python3

Python 3.6.9 (default, Nov 7 2019, 10:44:02)

[GCC 8.3.0] on linux

Type "help", "copyright", "credits" or "license" for more information.

>>> from __future__ import print_function

>>> import torch

>>> x = torch.rand(5, 3)

>>> print(x)

tensor([[0.9640, 0.3798, 0.5884],

[0.5195, 0.4264, 0.5103],

[0.3345, 0.3081, 0.1180],

[0.4120, 0.9787, 0.6587],

[0.7861, 0.1901, 0.9091]])

>>> torch.cuda.is_available()

True

>>> -
Detectron2
- 本記事はメモなので以下の説明に従ってインストール等をすることを勧める。
- 環境
- Python 3.6.9
- PyTorch 1.4
- CUDA 10.2
- 準備
- $ pip3 install cython
- $ pip3 install pycocotools
- インストール
- インストール済みのCUDAのバージョンが10.2だったので以下のコマンドでソースからビルドした。Prebuild版はCUDA 10.1に対応している。
$ cd ~/src$ git clone https://github.com/facebookresearch/detectron2.git$ cd detectron2$ pip3 install -e .
- インストール済みのCUDAのバージョンが10.2だったので以下のコマンドでソースからビルドした。Prebuild版はCUDA 10.1に対応している。
- はじめよう!
- チュートリアル
- 訓練済みモデルによる推論デモ(コマンドによる実行)
$ cd ~/src/detectron2- 画像ファイルからの推論
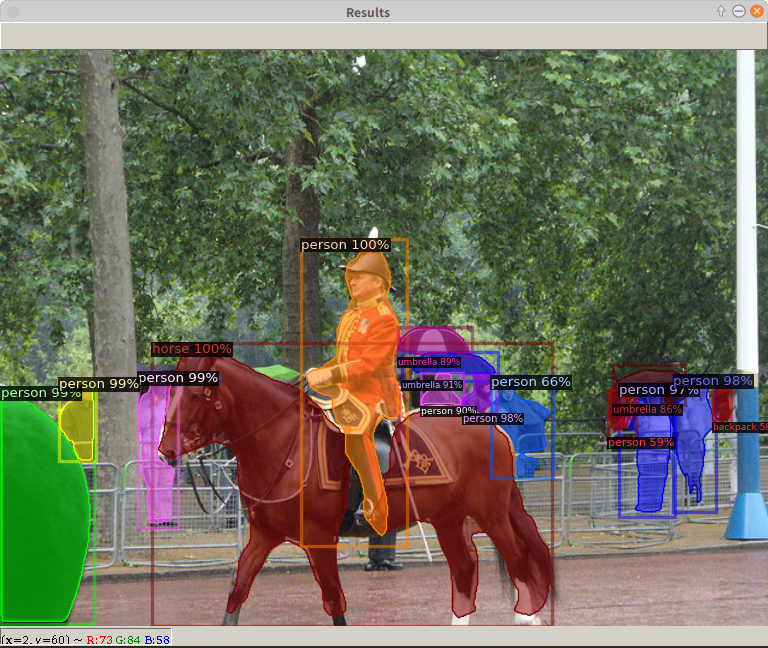
$ wget http://images.cocodataset.org/val2017/000000439715.jpg -O input.jpg$ python3 demo/demo.py --config-file configs/COCO-InstanceSegmentation/mask_rcnn_R_50_FPN_3x.yaml --input input.jpg --opts MODEL.WEIGHTS detectron2://COCO-InstanceSegmentation/mask_rcnn_R_50_FPN_3x/137849600/model_final_f10217.pkl- 成功すると下図のようなウインドウが表示される。なお、demo.pyの使い方は次のコマンドで調べることができる。
- $ python3 demo/demo.py -h
usage: demo.py [-h] [--config-file FILE] [--webcam]

[--video-input VIDEO_INPUT] [--input INPUT [INPUT ...]]

[--output OUTPUT] [--confidence-threshold CONFIDENCE_THRESHOLD]

[--opts ...]Detectron2 demo for builtin models
- ウェブカメラからの推論:
--webcamのオプションをつける$ python3 demo/demo.py --config-file configs/COCO-InstanceSegmentation/mask_rcnn_R_50_FPN_3x.yaml --webcam --opts MODEL.WEIGHTS detectron2://COCO-InstanceSegmentation/mask_rcnn_R_50_FPN_3x/137849600/model_final_f10217.pkl
- 動画からの推論:
--video-inputのオプションをつける$ python3 demo/demo.py --config-file configs/COCO-InstanceSegmentation/mask_rcnn_R_50_FPN_3x.yaml --video-input input.mp4 --opts MODEL.WEIGHTS detectron2://COCO-InstanceSegmentation/mask_rcnn_R_50_FPN_3x/137849600/model_final_f10217.pkl
-
- 訓練済みモデルによる推論デモ(プログラムによる実行)
- 上のコマンドの代わりにプログラムで実行するためには以下のようなコードが必要となる。
-
# detectron2で使うモジュールのインポート
from detectron2.engine import DefaultPredictor
from detectron2.config import get_cfg
from detectron2.utils.visualizer import Visualizer
from detectron2.data import MetadataCatalog
import cv2

# 画像の読み込み
im = cv2.imread("./input.jpg")

# ネットワークの設定
cfg = get_cfg()
cfg.merge_from_file("./configs/COCO-InstanceSegmentation/mask_rcnn_R_50_FPN_3x.yaml")
cfg.MODEL.ROI_HEADS.SCORE_THRESH_TEST = 0.5  # set threshold for this model
cfg.MODEL.WEIGHTS = "detectron2://COCO-InstanceSegmentation/mask_rcnn_R_50_FPN_3x/137849600/model_final_f10217.pkl"

# 推論
predictor = DefaultPredictor(cfg)
outputs   = predictor(im)

# 結果の表示
v = Visualizer(im[:, :, ::-1], MetadataCatalog.get(cfg.DATASETS.TRAIN[0]), scale=1.2)
v = v.draw_instance_predictions(outputs["instances"].to("cpu"))
cv2.imshow('Results', v.get_image()[:, :, ::-1])
cv2.waitKey(0)
cv2.destroyAllWindows()
- このコードをtest.pyとして~/src/detectron2/myprogディレクトリ下に保存する。myprogフォルダはないので事前に次のコマンド作成する。
- $ mkdir ~/src/detectron2/myprog
- 次のコマンドを実行すると上図のウインドウが表示される。ウインドウ上にマウスのポインタをもっていき、何かキーを押すとプログラムは終了する。
- $ cd ~/src/detectron2
- $ python3 myprog/test.py
- 訓練済みモデルによる推論デモ(プログラムによる実行)
終わり
コメント