2008年11月26日(水) カテゴリ:ODE, ODE 投稿者:demu [RSS 2.0]

ODE講座29: ヒンジジョイントを一定角度ずつ回すには

一度ずつ回転します.

ヒンジジョイントが一度ずつ回転します.


ODE(Open Dynamics Engine)講座の29回目です.今回はヒンジジョイントを一定角度ずつ回転させる方法を説明します.

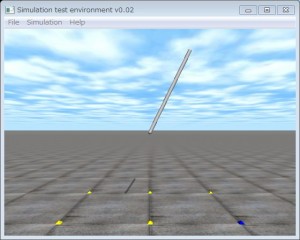
りんごさんから一度ずつヒンジジョイントを回転させるにはどうすればよいかというご質問を頂きました.その回答の1例としてサンプルプログラムを作りましたので参考にしてください.この例は時計の秒針です.1秒ごとに1度ずつ角度を増加しています.

具体的な方法は42,43行目でヒンジジョイントの最小,最大可動域をそれぞれ目標角度に設定しています.この角度をステップ毎に1度ずつ増加させることにより秒針のような動きを実現しています.

ただし,これはステッピングモータのシミュレーションとしては正しくありません.指定の角度を拘束条件として動力学計算をしているためトルクなどは全く考えていないからです.ステッピングモータをシミュレーションするためには,その動作原理をシミュレーションする必要があります.

なお,ソースコードはここからダウンロードできます

  1. //  stepper.cpp  by   Kosei Demura  2008-11-23
  2. //  これはステッピングモータのシミュレータではありません。
  3. #include <ode/ode.h>             // ODE
  4. #include <drawstuff/drawstuff.h> // ODEの描画ライブラリ
  5.  
  6. #ifdef WIN32
  7. #include <windows.h>
  8. #else
  9. #include <unistd.h>
  10. #endif
  11.  
  12. #define NUM 360
  13.  
  14. dWorldID    world;   // 動力学計算世界
  15. dBodyID     link;    // リンク 
  16. dJointID    joint;   // 関節
  17. static double THETA[NUM]; // 関節目標角[degree]
  18. static double l = 1.0, r = 0.02;
  19.  
  20. void start()   /*** 描画APIの初期化 ***/
  21. {
  22. float xyz[3] = {  2, 0, 1.0};   // 視点x, y, z [m]
  23. float hpr[3] = { -180.0, 0.00, 0.00};  // 視線(heading, pitch, roll) [°]
  24. dsSetViewpoint(xyz,hpr);               // 視点と視線の設定
  25. }
  26.  
  27.  
  28. // シミュレーションループ。簡単にするため衝突検出に関するコードは省略。
  29. void simLoop(int pause)
  30. {
  31. static int step = 0;     // シミュレーションのステップ数
  32. double angle; // 現在の関節角度
  33. double theta; // 目標角[rad]
  34.  
  35. if (step == 360) step = 0;
  36.  
  37. if (THETA[step] >= 180) THETA[step] = THETA[step] - 360;
  38. theta = THETA[step]*M_PI/180.0;
  39.  
  40. do
  41. {
  42. // 最小,最大可動域を同じ値にすることにより,その角度でヒンジジョイント拘束する
  43. dJointSetHingeParam(joint,  dParamLoStop, theta); // 最小可動域の設定
  44. dJointSetHingeParam(joint,  dParamHiStop, theta); // 最大可動域の設定
  45.  
  46. dWorldStep(world, 0.01);
  47. angle = dJointGetHingeAngle(joint)*180.0/M_PI;  // 現在の関節角[rad]
  48. }
  49. while (fabs(angle - THETA[step]) > 0.01);
  50. printf("step=%d angle=%5.2f \n",step,angle);
  51.  
  52. dsSetColor(1.0,1.0,1.0); // 色の設定(r, g, b) 各値は0~1、ここでは白に設定
  53. dsDrawCapsuleD(dBodyGetPosition(link), dBodyGetRotation(link), l, r);
  54. step++;
  55. #ifdef WIN32
  56. Sleep(1000);
  57. #else
  58. usleep(1000*1000);
  59. #endif
  60. }
  61.  
  62. int main(int argc, char *argv[])
  63. {
  64. dsFunctions fn; // 描画関数
  65. dMass mass;  // 質量パラメータ
  66. double x = 0, y = 0, z = 1.5;  // 重心位置
  67. double m = 1;           // 質量
  68. double anchor_x = 0, anchor_y = 0,anchor_z= 1.0;//回転中心
  69. double axis_x  = -1, axis_y = 0, axis_z  = 0;
  70.  
  71. fn.version = DS_VERSION;
  72. fn.start   = &start;
  73. fn.step    = &simLoop;
  74. fn.command = NULL;
  75. fn.path_to_textures = "../../drawstuff/textures";
  76.  
  77. dInitODE();  // ODEの初期化
  78. world = dWorldCreate();  // 動力学計算世界の生成
  79. dWorldSetGravity(world, 0, 0, -9.8);     // 重力設定
  80.  
  81. link = dBodyCreate(world);     // リンクの生成
  82. dBodySetPosition(link, x, y, z); // 位置の設定
  83. dMassSetZero(&mass);      // 質量パラメータの初期化
  84. dMassSetCappedCylinderTotal(&mass,m,3,r,l);  // リンクの質量計算
  85. dBodySetMass(link, &mass);  // 質量の設定
  86.  
  87. joint = dJointCreateHinge(world, 0); // ヒンジ関節生成
  88. dJointAttach(joint, link, 0); // 関節の取付け
  89. dJointSetHingeAnchor(joint, anchor_x, anchor_y,anchor_z); //関節中心の設定
  90. dJointSetHingeAxis(joint, axis_x, axis_y, axis_z); // 関節回転軸の設定
  91.  
  92. for (int i=0; i<NUM; i++) THETA[i] = i;
  93.  
  94. dsSimulationLoop(argc, argv, 640, 570, &fn); // シミュレーションループ
  95. dCloseODE();
  96. return 0;
  97. }

コメントどうぞ(Leave a comment)

An ODE Book (ODE本)

    Open Dynamics Engine
      ロボットを動かす感動体験! ODEを使い仮想空間の車輪型,腕型,脚型,人型ロボットをプログラミングして感動しよう.必要な知識はC言語の初歩と高校数学だけ.
カウンタ (since 2008-1-11)