今回はROSの通信のもう一つの通信方式であるサービスを理解しましょう。次のROS Wikiを参考にしています。
サービスはROSの通信方法の一つで、双方向通信に使います。ある仕事をお願いするクライアントとそれを処理して返すサーバーからなります。今回、作成するプログラムは速度指令値を送るクライアントと、それをロボットへ伝え(リクエスト)、ロボットから現在の速度を取得しクライアントに返す(レスポンス)サーバーです。次の手順でやりましょう。この例は、前回学んだトピック通信も入れていますので、実践的な内容です。
1.my_serviceパッケージの作成
$ cd ~/catkin_ws/src$ catkin_create_pkg my_service std_msgs rospy roscpp
2.srvファイルの作成
srvファイルはやり取りするデータの型を表すテキストファイル。拡張子がsrv、この例のファイル名はWheel.srv。
$ cd ~/catkin_ws/src/my_service$ mkdir srv$ cd srv$ gedit Wheel.srv
内容は次のコード。——-の上が入力(リクエスト)、下が出力(レスポンス)のデータ型を表します。
float64 target_linear_velocity
float64 target_angular_velocity
---------------
float64 current_linear_velocity
float64 current_angular_velocity
サーバーは並進、回転速度指令値target_linear_velocity, target_angular_velocityがリクエストされると、
現在の並進、回転速度current_linear_velocity, current_angular_velocityをリスポンスします。
3.Package.xmlの変更
~/catkin_ws/src/my_service/package.xmlの40、46行目のコメントタグを次のように外す。 つまり、message_generation, message_runtimeを有効にする必要があります。
<!-- Use build_depend for packages you need at compile time: -->
  <build_depend>message_generation</build_depend>
  <!-- Use build_export_depend for packages you need in order to build against this package: -->
  <!--   <build_export_depend>message_generation</build_export_depend> -->
  <!-- Use buildtool_depend for build tool packages: -->
  <!--   <buildtool_depend>catkin</buildtool_depend> -->
  <!-- Use exec_depend for packages you need at runtime: -->
  <exec_depend>message_runtime</exec_depend>
  <!-- Use test_depend for packages you need only for testing: -->
4.CMakeLists.txtの変更
~/catkin_ws/src/my_service/CMakeLists.txtの13行目、std_msgsの下に次のようにmessage_generationを追加。
find_package(catkin REQUIRED COMPONENTS
  roscpp
  rospy
  std_msgs
  message_generation
)
次の58~62行目を
## Generate services in the 'srv' folder
# add_service_files(
#   FILES
#   Service1.srv
#   Service2.srv
# )
以下に変更。
## Generate services in the 'srv' folder
 add_service_files(
   FILES
   Wheel.srv
 )
次の71~74行目
## Generate added messages and services with any dependencies listed here
# generate_messages(
#   DEPENDENCIES
#   std_msgs
# )
のコメントを外し、次にする。
## Generate added messages and services with any dependencies listed here
generate_messages(
DEPENDENCIES
std_msgs
)
次に示す105~110行目
#catkin_package(
#  INCLUDE_DIRS include
#  LIBRARIES my_service
#  CATKIN_DEPENDS roscpp rospy std_msgs
#  DEPENDS system_lib
#)
を次に変更する。
catkin_package(
  INCLUDE_DIRS include
  LIBRARIES my_service
  CATKIN_DEPENDS roscpp rospy std_msgs message_runtime
  DEPENDS system_lib
)
5.ビルド
ソースコードを書く前にサービスのライブラリを作成するためにcatkin_makeしてビルドしなければなりません。
$ cd ~/catkin_ws$ catkin build
ビルド時にエラーがでたら、CMakelists.txtを変更したか確認し、直して再度ビルド。
6.サービスサーバーのソースコード作成
では、依頼された仕事を処理するサーバープログラムを作ります。次のプログラムをgeditなどを使いwheel_server.cppというファイル名を付けて~/catkin_ws/src/my_service/src/wheel_server.cppと保存。一字でも打ち間違えると動かないのでコピペする。
#include "ros/ros.h"
#include <geometry_msgs/Twist.h>
#include "nav_msgs/Odometry.h"
#include "my_service/Wheel.h"  // 自動的に作られる

class Server {
public:
  Server();      // コンストラクタ
  ~Server() {};  // デストラクタ
  // オドメトリのコールバック関数
  void odomCallback(const nav_msgs::Odometry::ConstPtr& odom);
  // サーバーのコールバック関数(サービスの本体)
  bool wheelService(my_service::Wheel::Request  &req,
                    my_service::Wheel::Response &res);
  void loop(); // ループ関数
private:
  ros::Publisher cmd_pub;     // パブリッシャ
  ros::Subscriber odom_sub;   // サブスクライバ
  ros::NodeHandle nh;         // ノードハンドルの宣言
  ros::ServiceServer service; // サービス
  double tmp_linear_velocity; // 現在の並進速度
  double tmp_angluar_velocity; // 現在の回転速度
  const double max_linear_velocity =  0.7; // 最大並進速度
  const double min_linear_velocity = -0.7; // 最小並進速度
  const double max_angular_velocity =  1.2; // 最大回転速度
  const double min_angular_velocity = -1.2; // 最小回転速度
  geometry_msgs::Twist target_vel, tmp_vel; // 目標速度、現在の速度
};

// コンストラクタ
Server::Server()
{
  ROS_INFO("Ready to wheel");

  //サービスの設定
  service = nh.advertiseService("wheel",&Server::wheelService,this);
  // パブリッシャ(配信)の設定:
  cmd_pub= nh.advertise<geometry_msgs::Twist>("/create1/cmd_vel", 10);

  // サブスクライバ(購読)の設定
  // /odomトピックはロボットの速度情報を持っている
  odom_sub = nh.subscribe("/odom", 10, &Server::odomCallback, this);

  // 速度の初期化
  target_vel.linear.x  = 0.0;
  target_vel.linear.y  = 0.0;
  target_vel.linear.z  = 0.0;
  target_vel.angular.x = 0.0;
  target_vel.angular.y = 0.0;
  target_vel.angular.z = 0.0;
  tmp_vel.linear.x  = 0.0;
  tmp_vel.linear.y  = 0.0;
  tmp_vel.linear.z  = 0.0;
  tmp_vel.angular.x = 0.0;
  tmp_vel.angular.y = 0.0;
  tmp_vel.angular.z = 0.0;
}
// サーバーのコールバック関数
bool Server::wheelService(my_service::Wheel::Request  &req,
                          my_service::Wheel::Response &res)
{
  ROS_INFO("Set velocity: linear=%.2f angular=%.2f",
           req.target_linear_velocity, req.target_angular_velocity);
  // 指令速度が最小、最大速度内かチェック
  if (min_linear_velocity  > req.target_linear_velocity ||
      max_linear_velocity  < req.target_linear_velocity)  return false;
  if (min_angular_velocity > req.target_angular_velocity ||
      max_angular_velocity < req.target_angular_velocity) return false;
  // クライアントからの速度をロボットの速度指令とする
  target_vel.linear.x  = req.target_linear_velocity;
  target_vel.angular.z = req.target_angular_velocity;
  // /odomトピックからサブスクライブした速度情報をクライアントに返す
  res.current_linear_velocity  = tmp_vel.linear.x;
  res.current_angular_velocity = tmp_vel.angular.z;
  return true;
}
// オドメトリのコールバック関数(現在速度を知る)
void Server::odomCallback(const nav_msgs::Odometry::ConstPtr& odom)
{
  tmp_vel = odom->twist.twist; // 現在の速度ゲット
}
// ループ関数
void Server::loop()
{
  ros::Rate loop_rate(30); // Hz

  while(ros::ok()) {
    // ロボットを動かすため目標速度をパブリッシュ
    cmd_pub.publish(target_vel);
    // コールバック関数を呼ぶ
    ros::spinOnce();
    // 決められた周期でループするため寝て待つ
    loop_rate.sleep();
  }
}

int main(int argc, char **argv)
{
  //ROSの初期化 wheel_serverはノード名
  ros::init(argc, argv, "wheel_server");

  Server svr;
  svr.loop();
  return 0;
}
7.サービスクライアントのソースコード作成
次に仕事を依頼するのクライアントのソースコートを作成する。以下のソースコードをwheel_client.cppという名前で~/catkin_ws/src/my_service/src/wheel_client.cpp保存する。
#include "ros/ros.h"
#include "my_service/Wheel.h"  // 自動的に作られる

int main(int argc, char **argv)
{
  // 初期化 wheel_clientノード
  ros::init(argc, argv, "wheel_client");

  ros::NodeHandle nh;
  // サービスクライアントの設定
  ros::ServiceClient client = nh.serviceClient<my_service::Wheel>("wheel");

  my_service::Wheel srv;

  std::cout << "Input target linear  velocity:";
  std::cin >> srv.request.target_linear_velocity;
  std::cout << "Input target angular velocity:";
  std::cin >> srv.request.target_angular_velocity;

 // サービスを呼ぶ
  if (client.call(srv)) {
    // 成功したらサーバーからのレスポンスを表示
    ROS_INFO("Current linear_vel=%f  angular_vel=%f",
             (double) srv.response.current_linear_velocity,
             (double) srv.response.current_angular_velocity);
  }
  else {
    // 失敗したらエラー表示
    ROS_ERROR("Faild to call service wheel");
    return 1;
  }
  return 0;
}
8.CMakeLists.txtの変更とビルド
以下をCMakeLists.txtの最後に追加する。
add_executable(wheel_server src/wheel_server.cpp)
add_dependencies(wheel_server my_service_gencpp)
target_link_libraries(wheel_server ${catkin_LIBRARIES})

add_executable(wheel_client src/wheel_client.cpp)
add_dependencies(wheel_client my_service_gencpp)
target_link_libraries(wheel_client ${catkin_LIBRARIES})
次のコマンドでビルドする。
$ cd ~/catkin_ws$ catkin build
9.実行
- 端末を開き、以下のコマンドでGazeboを起動する。
$ roslaunch ca_gazebo create_empty_world.launch
- 端末をもう1個開き、次のコマンドでサーバーを起動する。
$ rosrun my_service wheel_server
- サーバーは次のように表示される。

- さらに、端末を開き、次のコマンドでクライアントを起動する。
$ rosrun my_service wheel_client
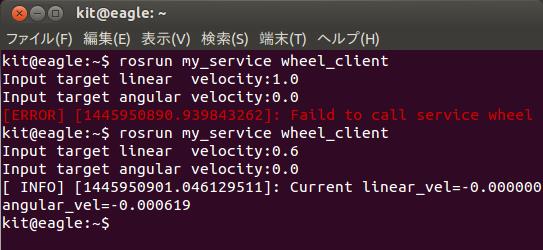
- クライアントはキーボードから入力(速度指令値)をサーバーへ送る。wheel_clientを起動した端末で並進速度(linear velocty)と角速度(angular velocity)を入力してエンターキーを押すとデータがサーバーへ送られます。その速度指令値が最小、最大値の範囲外ならエラーを返す。それ以外は、シミュレータ上のロボットが動きます。

成功したら終わり。うまく動かない場合は、打ち間違えや手順に間違いがないか確認し、再度実行しましょう。


コメント